【2.9.1】matplotlib高级教程之形状与路径——patches和path
一、什么是形状和路径
在一般的使用matplotlib进行绘图的时候,线形图、条形图、折线图、扇形图等等都是我们常见的一些绘图函数,但是有时候我们需要绘制一些特殊的形状和路径,比如我们要绘制一个椭圆,我们当然可以通过椭圆的函数表达式,然后选取一系列的(x,y)的坐标值进行依次相连,但是这样效率低下,而且不太好看。
1、形状
指的是matplotlib.patches包里面的一些列对象,比如我们常见的箭头,正方形,椭圆等等,也称之为“块”
2、路径
什么是路径?
表示一系列可能断开的、可能已关闭的线和曲线段。
指的是matplotlib.path里面所实现的功能,最简单的路径就是比如一条任意的曲线都可以看成是路径。比如我要绘制一个心形,就需要通过路径去完成。
但是画图我们说最重要的是画图的步骤,下面以椭圆为例详细讲解绘制基本形状的一般步骤。
二、形状的画图步骤:
2.1 第一步:创建画图对象以及子图
这一步和前面的一般画图方式没有什么区别,主要实现以下两句话
fig = plt.figure()
ax = fig.add_subplot(211, aspect='auto')
2.2 第二步:创建相对应的形状——创建椭圆
e1 = patches.Ellipse((xcenter, ycenter), width, height,angle=angle, linewidth=2, fill=False, zorder=2)
等价于:
e2 = patches.Arc((xcenter, ycenter), width, height,angle=angle, linewidth=2, fill=False, zorder=2)
因为Arc是继承自Ellipse类的,故而等价。
注意:上面的椭圆是通过patches包里面的类完成的,如果是比较常用的,比如Circle,也可以通过plt去实现。即
c1=plt.Circle(相关参数)
plt只实现了常用的几个,如Rectangle、Circle、Polygon这三个,它们可以通过plt.xxxx()的形式加以创建,如果要创建更多类型更复杂的图形,则使用patches模块。
补充:创建一个图形实际上就是调用它的构造函数即可,但是构造函数有许多的参数可选,这里不一一说明,仅仅以椭圆Arc为例加以说明,其他图形可以查看定义或者是相关文档:
有效的参数如下:
| Property | Description |
|---|---|
| agg_filter | a filter function, which takes a (m, n, 3) float array and a dpi value, and returns a (m, n, 3) array |
| alpha | float or None |
| animated | bool |
| antialiased | unknown |
| capstyle | {‘butt’, ‘round’, ‘projecting’} |
| clip_box | Bbox |
| clip_on | bool |
| clip_path | [(Path, Transform) |
| color | color |
| contains | callable |
| edgecolor | color or None or ‘auto’ |
| facecolor | color or None |
| figure | Figure |
| fill | bool |
| gid | str |
| hatch | {'/', ‘', ' |
| in_layout | bool |
| joinstyle | {‘miter’, ‘round’, ‘bevel’} |
| label | object |
| linestyle | {'-’, ‘–’, ‘-.’, ‘:’, ‘’, (offset, on-off-seq), …} |
| linewidth | float or None for default |
| path_effects | AbstractPathEffect |
| picker | None or bool or float or callable |
| rasterized | bool or None |
| sketch_params | (scale: float, length: float, randomness: float) |
| snap | bool or None |
| transform | Transform |
| url | str |
| visible | bool |
| zorder | float |
2.3 第三步:将图形添加到图中——这是非常核心的一步
光创建一个图形对象还不够,还需要添加进“ Axes ”对象里面去,即我们所创建的ax对象,使用它的add_patch()方法
ax.add_patch(e1)
ax.add_patch(e2)
除此之外,还可以将每一个形状先添加到一个集合里面,然后再将容纳了多个patch对象的集合添加进ax对象里面,等价如下:
patches=[]      #创建容纳对象的集合

patches.append(e1)   #将创建的形状全部放进去

patches.append(e2)

collection=PatchCollection(patches)  #构造一个Patch的集合

ax.add_collection(collection)    #将集合添加进axes对象里面去

plt.show() #最后显示图片即可
上述案例的完整代码如下
import numpy as np
from matplotlib import patches
import matplotlib.pyplot as plt

#绘制一个椭圆需要制定椭圆的中心,椭圆的长和高
xcenter, ycenter = 1,1
width, height = 0.8,0.5
angle = -30  #椭圆的旋转角度

#第一步:创建绘图对象
fig = plt.figure()
ax = fig.add_subplot(211, aspect='auto')
ax.set_xbound(-1,3)
ax.set_ybound(-1,3)

#第二步
e1 = patches.Ellipse((xcenter, ycenter), width, height,
                     angle=angle, linewidth=2, fill=False, zorder=2)

#第三步
ax.add_patch(e1)

#第一步
ax = fig.add_subplot(212, aspect='equal')
ax.set_xbound(-1,3)
ax.set_ybound(-1,3)

#第二步
e2 = patches.Arc((xcenter, ycenter), width, height,
                     angle=angle, linewidth=2, fill=False, zorder=2)

#第三步
ax.add_patch(e2)

plt.show()
使用集合的源代码如下:
import numpy as np
from matplotlib import patches
import matplotlib.pyplot as plt
from matplotlib.collections import PatchCollection


#绘制一个椭圆需要制定椭圆的中心,椭圆的长和高
xcenter, ycenter = 1,1
width, height = 0.8,0.5
angle = -30  #椭圆的旋转角度

fig = plt.figure()
ax = fig.add_subplot(211, aspect='auto')
ax.set_xbound(-1,3)
ax.set_ybound(-1,3)

e1 = patches.Ellipse((0, 0), width, height,
                     angle=angle, linewidth=2, fill=False, zorder=2)

e2 = patches.Arc((2, 2), width=3, height=2,
                     angle=angle, linewidth=2, fill=False, zorder=2)


patches=[]
patches.append(e1)
patches.append(e2)
collection=PatchCollection(patches)
ax.add_collection(collection)
运行结果如下:
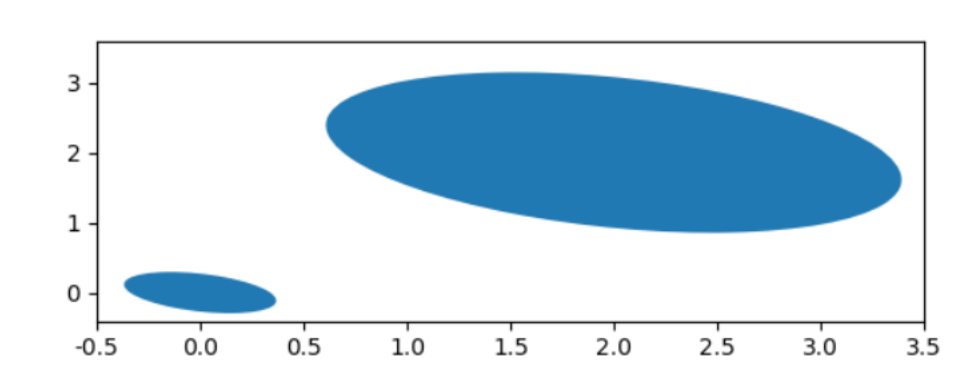
三、patches模块中类型大全
patches所有的类型都在matplotlib.patches包中,因此需要事先导入
Classes
- Arc(xy, width, height[, angle, theta1, theta2]) An elliptical arc.
- Arrow(x, y, dx, dy[, width]) An arrow patch.
- ArrowStyle ArrowStyle is a container class which defines several arrowstyle classes, which is used to create an arrow path along a given path.
- BoxStyle BoxStyle is a container class which defines several boxstyle classes, which are used for FancyBboxPatch.
- Circle(xy[, radius]) A circle patch.
- CirclePolygon(xy[, radius, resolution]) A polygon-approximation of a circle patch.
- ConnectionPatch(xyA, xyB, coordsA[, …]) A ConnectionPatch class is to make connecting lines between two points (possibly in different axes).
- ConnectionStyle ConnectionStyle is a container class which defines several connectionstyle classes, which is used to create a path between two points.
- Ellipse(xy, width, height[, angle]) A scale-free ellipse.
- FancyArrow(x, y, dx, dy[, width, …]) Like Arrow, but lets you set head width and head height independently.
- FancyArrowPatch([posA, posB, path, …]) A fancy arrow patch.
- FancyBboxPatch(xy, width, height[, …]) Draw a fancy box around a rectangle with lower left at xy*=(*x, y) with specified width and height.
- Patch([edgecolor, facecolor, color, …]) A patch is a 2D artist with a face color and an edge color.
- PathPatch(path, **kwargs) A general polycurve path patch.
- Polygon(xy[, closed]) A general polygon patch.
- Rectangle(xy, width, height[, angle]) Draw a rectangle with lower left at xy = (x, y) with specified width, height and rotation angle.
- RegularPolygon(xy, numVertices[, radius, …]) A regular polygon patch.
- Shadow(patch, ox, oy[, props]) Create a shadow of the given patch offset by ox, oy.
- Wedge(center, r, theta1, theta2[, width]) Wedge shaped patch.
图形的综合应用案例
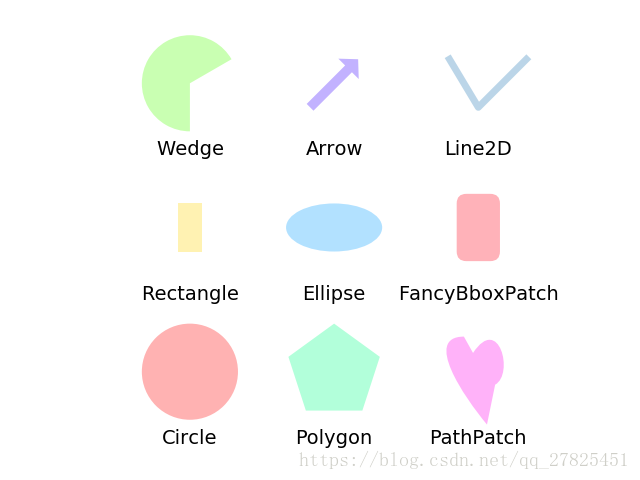
import matplotlib.pyplot as plt
import numpy as np
import matplotlib.path as mpath
import matplotlib.lines as mlines
import matplotlib.patches as mpatches
from matplotlib.collections import PatchCollection

#定义函数,给每一个patch都设置标签说明
def label(xy, text):
    y = xy[1] - 0.15  # 标签放置在patch下方的0.15位置处
    plt.text(xy[0], y, text, ha="center", family='sans-serif', size=14)


fig, ax = plt.subplots()
# 创建一个3x3的网格
grid = np.mgrid[0.2:0.8:3j, 0.2:0.8:3j].reshape(2, -1).T

#创建容纳patch的集合
patches = []

# 添加一个圆Circle
circle = mpatches.Circle(grid[0], 0.1, ec="none")
patches.append(circle)
label(grid[0], "Circle")

# 添加一个Rectangle
rect = mpatches.Rectangle(grid[1] - [0.025, 0.05], 0.05, 0.1, ec="none")
patches.append(rect)
label(grid[1], "Rectangle")

# 添加一个楔形,即圆的一部分
wedge = mpatches.Wedge(grid[2], 0.1, 30, 270, ec="none")
patches.append(wedge)
label(grid[2], "Wedge")

# 添加一多边形,这里添加一个五边形
polygon = mpatches.RegularPolygon(grid[3], 5, 0.1)
patches.append(polygon)
label(grid[3], "Polygon")

# 添加一个椭圆,也可以使用Arc
ellipse = mpatches.Ellipse(grid[4], 0.2, 0.1)
patches.append(ellipse)
label(grid[4], "Ellipse")

# 添加一个箭头
arrow = mpatches.Arrow(grid[5, 0] - 0.05, grid[5, 1] - 0.05, 0.1, 0.1,
                       width=0.1)
patches.append(arrow)
label(grid[5], "Arrow")

# 添加一个路径path,路径的详细解释后面会讲到,相比于简单的patch,稍显复杂
Path = mpath.Path
path_data = [
    (Path.MOVETO, [0.018, -0.11]),
    (Path.CURVE4, [-0.031, -0.051]),
    (Path.CURVE4, [-0.115, 0.073]),
    (Path.CURVE4, [-0.03, 0.073]),
    (Path.LINETO, [-0.011, 0.039]),
    (Path.CURVE4, [0.043, 0.121]),
    (Path.CURVE4, [0.075, -0.005]),
    (Path.CURVE4, [0.035, -0.027]),
    (Path.CLOSEPOLY, [0.018, -0.11])]
codes, verts = zip(*path_data)
path = mpath.Path(verts + grid[6], codes)
patch = mpatches.PathPatch(path)
patches.append(patch)
label(grid[6], "PathPatch")

# 添加一个box
fancybox = mpatches.FancyBboxPatch(
    grid[7] - [0.025, 0.05], 0.05, 0.1,
    boxstyle=mpatches.BoxStyle("Round", pad=0.02))
patches.append(fancybox)
label(grid[7], "FancyBboxPatch")

# 添加一条折线——注意这里的折线和前面所画的这显示不一样的,这里的折线是一个形状
x, y = np.array([[-0.06, 0.0, 0.1], [0.05, -0.05, 0.05]])
line = mlines.Line2D(x + grid[8, 0], y + grid[8, 1], lw=5., alpha=0.3)
label(grid[8], "Line2D")

colors = np.linspace(0, 1, len(patches))
#将patch集合包装成PatchCollection
collection = PatchCollection(patches, cmap=plt.cm.hsv, alpha=0.3)
collection.set_array(np.array(colors))
#将PatchCollection添加给axes对象
ax.add_collection(collection)
#将折线添加到axes对象
ax.add_line(line)

plt.axis('equal')
plt.axis('off')
plt.tight_layout()

plt.show()
四、路径path
4.1实例
路径里面所涉及到的类容相对较多,这里只介绍简单的应用。首先通过一个例子加以说明。这个例子是要绘制一个简单的矩形路径。
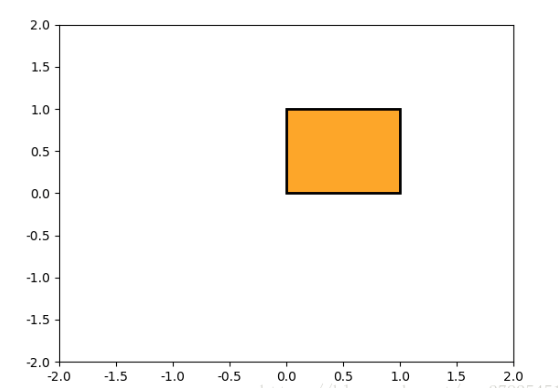
import matplotlib.pyplot as plt
from matplotlib.path import Path
import matplotlib.patches as patches

#import matplotlib.patheffects
#import matplotlib.transforms

verts = [
    (0., 0.), # 矩形左下角的坐标(left,bottom)
    (0., 1.), # 矩形左上角的坐标(left,top)
    (1., 1.), # 矩形右上角的坐标(right,top)
    (1., 0.), # 矩形右下角的坐标(right, bottom)
    (0., 0.), # 封闭到起点    ]

codes = [Path.MOVETO,
         Path.LINETO,
         Path.LINETO,
         Path.LINETO,
         Path.CLOSEPOLY,
         ]

path = Path(verts, codes) #创建一个路径path对象

#依然是三步走
#第一步:创建画图对象以及创建子图对象
fig = plt.figure()
ax = fig.add_subplot(111)

#第二步:创建一个patch,路径依然也是通过patch实现的,只不过叫做pathpatch
patch = patches.PathPatch(path, facecolor='orange', lw=2)

#第三步:将创建的patch添加到axes对象中
ax.add_patch(patch)

#显示
ax.set_xlim(-2,2)
ax.set_ylim(-2,2)
plt.show()
总结:通过上面的例子显示,绘制 “路径” 的过程和绘制普通的 “patch” 是大致一样的,依然是遵循一个 “三步走”的步骤,核心在于第二步,也是要创建一个PathPatch对象,它也是来自于patches包,和普通的rectangle,circle是等价的概念,
patch = patches.PathPatch(path, facecolor=‘orange’, lw=2)
但是这里的path对象是要事先自己创建的。
总结:实际上,matplotlib中的rectangle、circle、polygon等所有简单的简单图形都采用简单的路径path去实现的,只不过用类的形式进行了更高级的封装。像直方图hist () 和 条形图bar ()这样的绘图函数创建了许多基元图像,它们的本质也是通过路径去实现的,
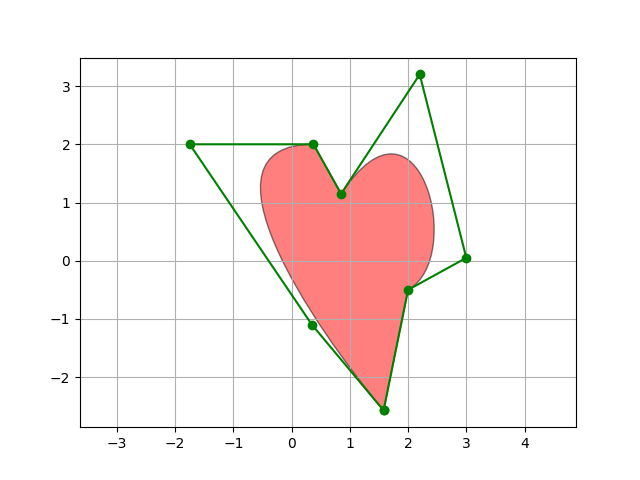
import matplotlib.path as mpath
import matplotlib.patches as mpatches
import matplotlib.pyplot as plt


fig, ax = plt.subplots()

Path = mpath.Path
path_data = [
    (Path.MOVETO, (1.58, -2.57)),
    (Path.CURVE4, (0.35, -1.1)),
    (Path.CURVE4, (-1.75, 2.0)),
    (Path.CURVE4, (0.375, 2.0)),
    (Path.LINETO, (0.85, 1.15)),
    (Path.CURVE4, (2.2, 3.2)),
    (Path.CURVE4, (3, 0.05)),
    (Path.CURVE4, (2.0, -0.5)),
    (Path.CLOSEPOLY, (1.58, -2.57)),
    ]
codes, verts = zip(*path_data)
path = mpath.Path(verts, codes)
patch = mpatches.PathPatch(path, facecolor='r', alpha=0.5)
ax.add_patch(patch)

# plot control points and connecting lines
x, y = zip(*path.vertices)
line, = ax.plot(x, y, 'go-')

ax.grid()
ax.axis('equal')
plt.show()
下面将使用路径去绘制一个条形统计图。
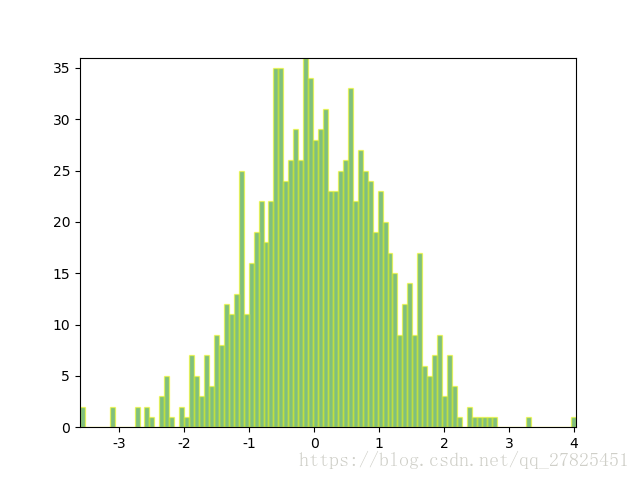
import numpy as np

import matplotlib.pyplot as plt
import matplotlib.patches as patches
import matplotlib.path as path

fig = plt.figure()
ax = fig.add_subplot(111)

# 固定随机数种子
np.random.seed(19680801)

# 产生1000组随机数,并进行组织
data = np.random.randn(1000)
n, bins = np.histogram(data, 100)
print(data.shape,n.shape,bins.shape,sep='   ')

# 得到每一个条形图的四个角落的位置
left = np.array(bins[:-1])
right = np.array(bins[1:])
bottom = np.zeros(len(left))
top = bottom + n
nrects = len(left)

nverts = nrects*(1+3+1)
verts = np.zeros((nverts, 2))
codes = np.ones(nverts, int) * path.Path.LINETO
codes[0::5] = path.Path.MOVETO
codes[4::5] = path.Path.CLOSEPOLY
verts[0::5,0] = left
verts[0::5,1] = bottom
verts[1::5,0] = left
verts[1::5,1] = top
verts[2::5,0] = right
verts[2::5,1] = top
verts[3::5,0] = right
verts[3::5,1] = bottom

#第二步:构造patches对象
barpath = path.Path(verts, codes)
patch = patches.PathPatch(barpath, facecolor='green', edgecolor='yellow', alpha=0.5)

#添加patch到axes对象
ax.add_patch(patch)

ax.set_xlim(left[0], right[-1])
ax.set_ylim(bottom.min(), top.max())

plt.show()
总结:从上面可以得知,我们的绘图,包括条形图,扇形图等都是通过基本的简单的路径path去实现的,但是这样做起来很麻烦,喊不简单,因而使用hist、bar等高层函数进一步封装,简化绘图操作。
4.2 path对象
首先需要导入matplotlib.path模块。
在使用路径的时候一般需要两个重要的参数,Path类的定义如下:
class Path(vertices, codes=None, _interpolation_steps=1, closed=False, readonly=False)
故而需要传递两个必要的参数:
rectpath = path.Path(vertices, codes)
那么vertices和codes到底是什么意思呢?
vertices是指的是路径path所经过的关键点的一系列坐标(x,y)
codes指的是点与点之间到底是怎么连接的,是直线连接?曲线连接?还是。。。
(1)vertices
vertices = [

(0., 0.), # left, bottom

(0., 1.), # left, top

(1., 1.), # right, top

(1., 0.), # right, bottom

(0., 0.), # ignored

]
(2)codes
codes = [

Path.MOVETO,

Path.LINETO,

Path.LINETO,

Path.LINETO,

Path.CLOSEPOLY,

]

path = Path(verts, codes)  #创建path对象。vertices好理解,那么codes到底什么意思?
- MOVETO :拿起钢笔, 移动到给定的顶点。一般指的是 “起始点”
- LINETO :从当前位置绘制直线到给定顶点。
- CURVE3 :从当前位置 (用给定控制点) 绘制一个二次贝塞尔曲线到给定端点。
- CURVE4 :从当前位置 (与给定控制点) 绘制三次贝塞尔曲线到给定端点。
- CLOSEPOLY :将线段绘制到当前折线的起始点。
- STOP :整个路径末尾的标记 (当前不需要和忽略)
总结:在创建vertices和codes的时候,每个点和每一个codes是对应着的,如上面所示,一定要注意这样的对应关系。
(3)path对象的另一种实现
path_data =
	(Path.MOVETO, [0.018, -0.11]),  #起
	(Path.CURVE4, [-0.031, -0.051])
	(Path.CURVE4, [-0.115, 0.073])
	(Path.CURVE4, [-0.03, 0.073])
	(Path.LINETO, [-0.011, 0.039])
	(Path.CURVE4, [0.043, 0.121])
	(Path.CURVE4, [0.075, -0.005])
	(Path.CURVE4, [0.035, -0.027])
	(Path.CLOSEPOLY, [0.018, -0.11])]  #闭合到起
codes, verts = zip(*path_data)   #使用内置的Zip函
heartpath = path.Path(verts, codes)   #创建Path对
patch = mpatches.PathPatch(path)    #将path包装成一个patch对
patches.append(patch)
3、补充
上面知识介绍了一些最基本的路径path的操作,路径的各种操作很复杂,还有各种各样的路径操作函数,还有路径效果和相关的一些操作,在
import matplotlib.patheffects
import matplotlib.transforms
这两个模块里面,关于这两个模块的操作,这理由不讨论了,有兴趣可以查阅官方文档。
参考资料
